consul操作
Consul是一个分布式高可用、高扩展、高性能的微服务系统,可以注册一个服务,例如mysql,redis等基础信息,以key/value存储格式
安装前或者安装检测一下端口占用
Windows:
如果没有结果说明没有被占用
netstat -ano| findstr "8500"
Linux:
如果没有结果说明没有被占用
netstat -antp |grep 8500
下载地址 官网 https://www.consul.io/downloads
win下载解压后 可以直接运行 建议添加到bin目录 win添加到path下
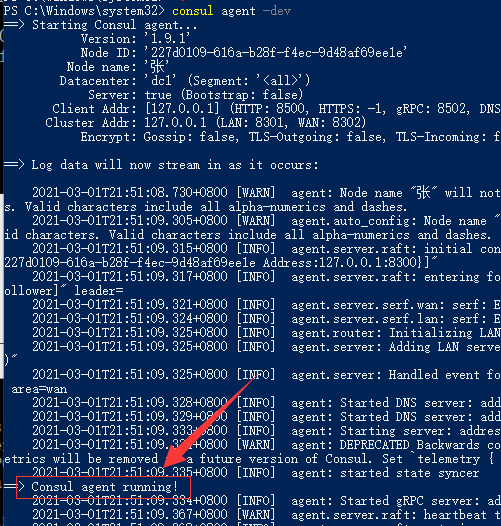
测试启动
consul agent -dev
看到 Consul agent running! 就是启动成功了,也是安装成功了
linux 操作
## 从官网下载最新版本的Consul服务
wget https://releases.hashicorp.com/consul/1.5.3/consul_1.5.3_linux_amd64.zip
##使用unzip命令解压
unzip consul_1.5.3_linux_amd64.zip
##将解压好的consul可执行命令拷贝到/usr/local/bin目录下
cp consul /usr/local/bin
##测试一下
consul

接下来 服务端 启动一个集群
consul agent -server -bootstrap-expect 1 -data-dir /data/consul -node=consul1 -bind=192.168.0.104 -ui -rejoin -config-dir=/etc/consul.d -client=0.0.0.0

consul agent -server -bootstrap-expect 1 -bind=192.168.0.108 -client=0.0.0.0 -data-dir=/data/consul -node=consul2 -rejoin -ui -join 192.168.0.104
consul agent -server -bootstrap-expect 1 -bind=192.168.0.107 -client=0.0.0.0 -data-dir=/data/consul -node=consul3 -rejoin -ui -join 192.168.0.104
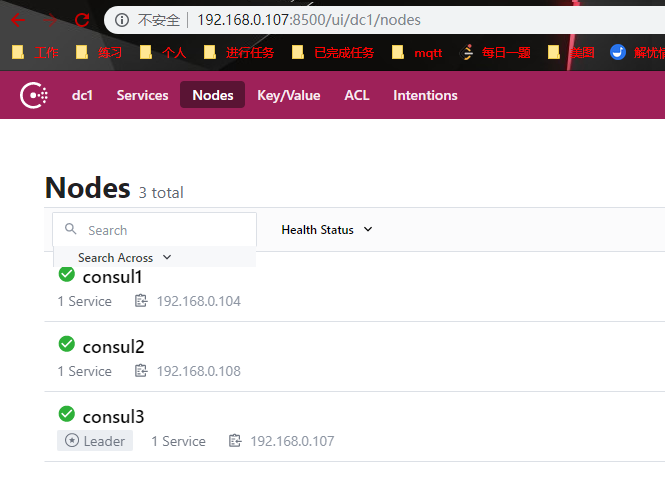
实际上我启动后主节点检测自动到了 192.168.0.107 上了 如下图
服务器命令行查看集运
consul members
consul info
优雅关闭
[root@192 ~]# consul leave
Graceful leave complete
现在客户端链接一下
consul agent -data-dir /tmp/consul -node=c1 -bind=192.168.0.101 -config-dir=/etc/consul.d/ -join 192.168.0.102

consul agent -data-dir /tmp/consul -node=zhang -bind=192.168.0.106 -config-dir=/etc/consul.d/ -join 192.168.0.102
定义配置文件 .d表示配置文件
mkdir /etc/consul.d
touch web.json
{"service": {"name": "client1", "tags": ["rails"], "port": 80}}重新输入客户端启动 命令行
然后根据http 查看启动的服务信息
http://192.168.0.102:8500/v1/catalog/service/bj38
也可以命令行
curl -s 192.168.0.102:8500/v1/catalog/service/bj38
伍先生
- 职业:
程序员,产品 - 码龄:
9.3 - 技能:
PHP Go 前端 - 微信:
JwCode - 公众号/小程序:
渐悟分享