etcd操作
1 安装etcd
在两台服务器上执行下面的命令,安装etcd:
yum -y install etcd
执行下面的命令,查看etcd:
yum list installed |grep -i etcd
如果出现如下结果,表示安装成功:
etcd.x86_64 3.3.11-2.el7.centos @extras
三台机器都装一下
然后编写集群启动脚本
第一台服务器 node1
TOKEN=token-01
CLUSTER_STATE=new
CLUSTER=n1=http://192.168.0.102:2380,n2=http://192.168.0.103:2380,n3=http://192.168.0.104:2380

etcd --data-dir=data.etcd --name n1 \
	--initial-advertise-peer-urls http://192.168.0.102:2380 --listen-peer-urls http://192.168.0.102:2380 \
	--advertise-client-urls http://192.168.0.102:2379 --listen-client-urls http://192.168.0.102:2379 \
	--initial-cluster ${CLUSTER} \
	--initial-cluster-state ${CLUSTER_STATE} --initial-cluster-token ${TOKEN}
启动
sudo sh /home/etcd/etcd_start.sh
第二台服务器 node2
TOKEN=token-01
CLUSTER_STATE=new
CLUSTER=n1=http://192.168.0.102:2380,n2=http://192.168.0.103:2380,n3=http://192.168.0.104:2380

etcd --data-dir=data.etcd --name n2 \
	--initial-advertise-peer-urls http://192.168.0.103:2380 --listen-peer-urls http://192.168.0.103:2380 \
	--advertise-client-urls http://192.168.0.103:2379 --listen-client-urls http://192.168.0.103:2379 \
	--initial-cluster ${CLUSTER} \
	--initial-cluster-state ${CLUSTER_STATE} --initial-cluster-token ${TOKEN}
启动
sudo sh /home/etcd/etcd_start.sh
第三台服务器 node3
TOKEN=token-01
CLUSTER_STATE=new
CLUSTER=n1=http://192.168.0.102:2380,n2=http://192.168.0.103:2380,n3=http://192.168.0.104:2380

etcd --data-dir=data.etcd --name n3 \
	--initial-advertise-peer-urls http://192.168.0.104:2380 --listen-peer-urls http://192.168.0.104:2380 \
	--advertise-client-urls http://192.168.0.104:2379 --listen-client-urls http://192.168.0.104:2379 \
	--initial-cluster ${CLUSTER} \
	--initial-cluster-state ${CLUSTER_STATE} --initial-cluster-token ${TOKEN}
启动
sudo sh /home/etcd/etcd_start.sh
注意点
1 启动后互相之间无法通信,一般是因为防火墙的原因    执行这命令  systemctl stop firewalld
2 每一个节点里IP就是服务器IP
下边 写两份代码测试一下
第一份 发送/获取数据操作
基础操作.go
package main

import (
	"context"
	"fmt"
	"os"
	"time"

	"go.etcd.io/etcd/clientv3"
	//"github.com/coreos/etcd/clientv3"   //这里的话这两个库都是OK的
)

func main1() {
	cli, err := clientv3.New(clientv3.Config{
		Endpoints:   []string{"192.168.0.102:2379"},
		DialTimeout: 5 * time.Second,
	})
	if err != nil {
		// handle error!
		fmt.Printf("connect to etcd failed, err:%v\n", err)
		return
	}
	fmt.Println("connect to etcd success")
	defer cli.Close()
	// put
	ctx, cancel := context.WithTimeout(context.Background(), time.Second)
	_, err = cli.Put(ctx, "q1mi", "dsb")
	cancel()
	if err != nil {
		fmt.Printf("put to etcd failed, err:%v\n", err)
		return
	}
	// get
	ctx, cancel = context.WithTimeout(context.Background(), time.Second)
	resp, err := cli.Get(ctx, "qimi")
	cancel()
	if err != nil {
		fmt.Printf("get from etcd failed, err:%v\n", err)
		return
	}
	for _, ev := range resp.Kvs {
		fmt.Printf("%s:%s\n", ev.Key, ev.Value)
	}
}

func main() {
	etcdCli, err := clientv3.New(clientv3.Config{
		Endpoints:   []string{"192.168.0.104:2379"},
		DialTimeout: 5 * time.Second,
	})
	if err != nil {
		fmt.Println("clientv3.New", err)
		os.Exit(-1)
	}
	defer etcdCli.Close()
	fmt.Println("etcd runing...")

	//发送数据
	ctx, cancel := context.WithTimeout(context.Background(), time.Second)
	_, err = etcdCli.Put(ctx, "张三", "50个W")
	cancel()
	if err != nil {
		fmt.Println("etcdCli.Put", err)
		os.Exit(-1)
	}

	//读取指定数据
	ctx, cancel = context.WithTimeout(context.Background(), time.Second)
	resp, err := etcdCli.Get(ctx, "张三")
	if err != nil {
		fmt.Println("etcdCli.Get", err)
		os.Exit(-1)
	}
	cancel()
	fmt.Println(resp)

}
监听数据.go
package main
import (
"context"
"fmt"
"github.com/coreos/etcd/clientv3"
"time"
)
func main() {
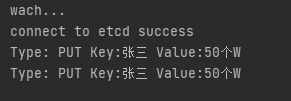
fmt.Println("wach...")
cli, err := clientv3.New(clientv3.Config{
Endpoints: []string{"192.168.0.102:2379"},
DialTimeout: 5 * time.Second,
})
if err != nil {
// handle error!
fmt.Printf("connect to etcd failed, err:%v\n", err)
return
}
fmt.Println("connect to etcd success")
defer cli.Close()
wachChan := cli.Watch(context.Background(),"张三")
for wachdata := range wachChan{
for _,ev := range wachdata.Events{
fmt.Printf("Type: %s Key:%s Value:%s\n", ev.Type, ev.Kv.Key, ev.Kv.Value)
}
}
}这里也有几个问题需要注意
1 ectd 这个包你可能不好下载导下来 这里建议你直接 go get go.etcd.io/etcd/clientv3
2 这个时候会又发生另一个问题 他会报个错说个版本啥的 其实就是因为grpc版本不一致导致的 在 go.mod 设置一下就行 在最下面加一行这个 replace google.golang.org/grpc => google.golang.org/grpc v1.26.0 备注 问题URL 报错和这个一样 http://blog.jwcode.cn/index/blog/reading?rd=43
下面说一下 这份代码应用场景
我们将etcd 当成配置中心
第一份代码 发送数据到 104 的服务器上
104的服务器收到就会通知到第二份代码
同时因为我们链接的服务器IP 但是数据是同步的 这样我们也同时验证了这个集群是OK的
.
.
.
.
.
伍先生
- 职业:
程序员,产品 - 码龄:
9.3 - 技能:
PHP Go 前端 - 微信:
JwCode - 公众号/小程序:
渐悟分享